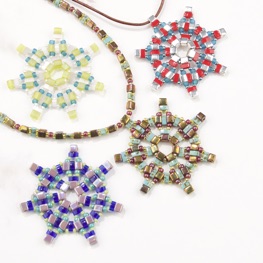
Cartwheel Pendant Illustrated Directions
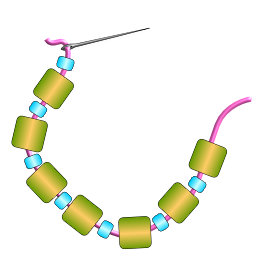
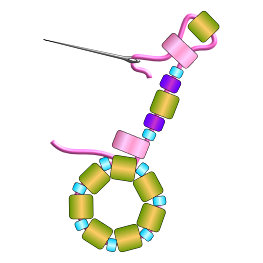
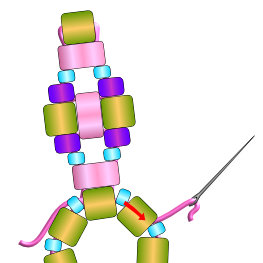
Begin with a 7ft. length of thread. String on an alternating pattern of one 11/0 seed bead and one square bead until there are seven of each type (14 beads total).
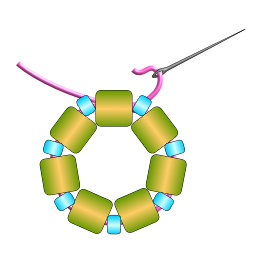
Bring the needle through the first two strung beads forming a loop. String back through the entire loop again to reinforce.
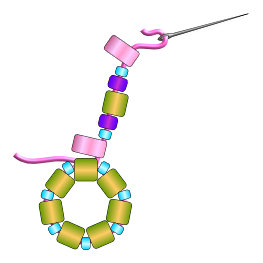
With the thread exiting one of the square beads, pick up one half tila (HTL), one 11/0 seed bead, one 8/0 seed bead, one square bead (SB), one 8/0 seed bead, one 11/0 seed bead and one HTL.
Pick up a square bead and stitch into the second hole of the HTL most recently added. Pull thread tight to secure. The square bead should lock into position, sitting firmly on top of the half tila.
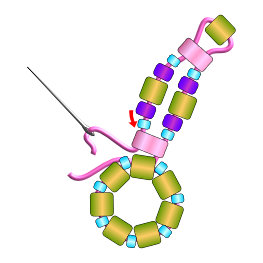
Next string on one 11/0, one 8/0, one SB, one 8/0, and one 11/0. This section should exactly match the row of beads it lays next to. Go through the second hole of the next HTL. The thread should now be just above the original loop of beads.
Secure by going through the SB directly below the needle (the same one you used in step 3) from the opposite side. Pull tight and make sure no thread is showing. This forms the first spoke in the wheel and it should sit squarely on top of the SB from the original loop of beads.
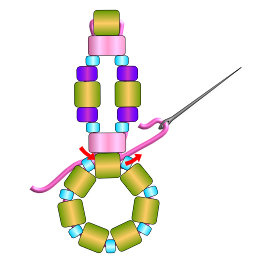
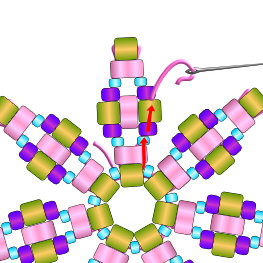
Travel back up into the section just completed, passing through an HTL, 11/0, 8/0, and a SB. Exit the SB on the right side of the spoke.
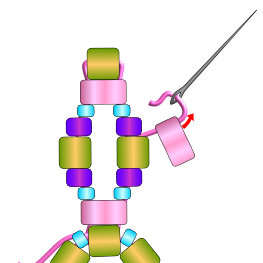
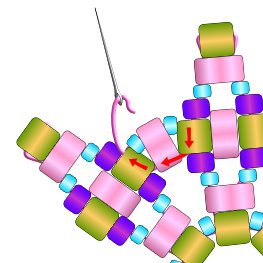
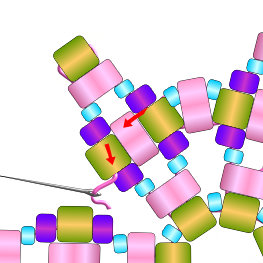
Add one HTL.
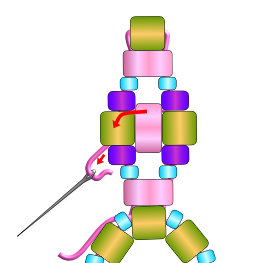
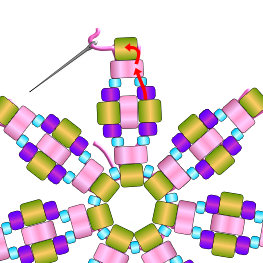
Crossing over the beadwork, go down into the SB on the left side of the spoke. As the thread tightens the HTL will sit between and on top of the two Square beads.

Stitch through the lower hole of the HTL going from left to right. Push the HTL in between the two square beads.
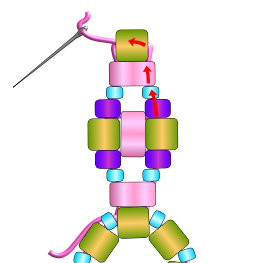
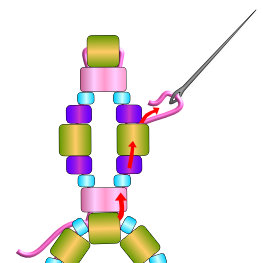
Stitch up through the closest SB and continue up through the 8/0, 11/0, and HTL. Pull thread to secure and make sure there is an even tension throughout this section. Pass through the SB at the tip of the section.
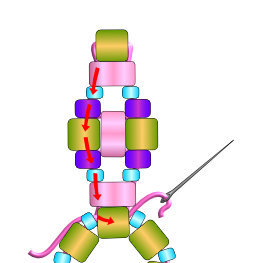
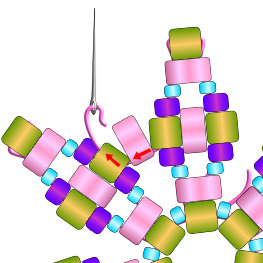
Go down through all the beads in the left side of the spoke. Exit the left hole of the tila right above the loop of beads. Again, check the tension of this section and adjust and tighten as needed before moving on. String through the original square bead from left to right.
Going from left to right string through two beads in the loop (11/0, SB)
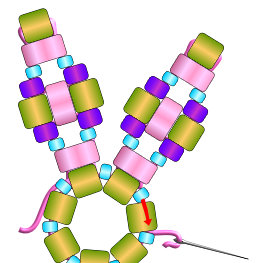
Repeat to create an identical spoke.
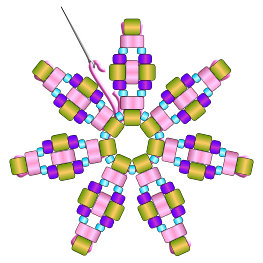
Continue adding arms until all seven base square beads have arms attached. Remember to keep a good tension in each section before moving to the next.
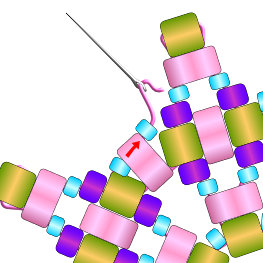
Stitch through the next square bead with the thread exiting on the right side of the square.
Using the thread on the right side of this spoke (Note: the thread should be exiting the SB not a 15/0) go up into the HTL directly above. Continue up through the 11/0, 8/0 and SB.
Continue up through the next 8/0,11/0 and HTL and turn left into the SB at the tip of the spoke.

Now go down into the beads on the left side of the spoke. Pass through the HTL, 11/0,8/0 and exit the SB.
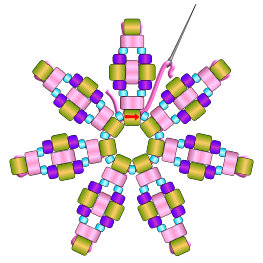
Add one HTL. Stitch up through the closest SB on the next spoke over to the left. Pull to secure. The HTL just added should form a bridge between the two spokes.
Add one 11/0, pass through the top hole of the bridge HTL and add another 11/0.
Go down into the SB on the closest spoke. Pull thread to secure. This should complete the connection between the two spokes. Now begin moving the thread to the left to position it for the next bridge section. Pass through the bottom hole of the closest HTL (to the left). Still moving to the left go up into the nearest SB.
Cross through the top hole of the next HTL. Now go down into the SB. This should position you in between the next two spokes to be connected.

Continue stitching in this manner until all the arms have been joined together.
Cartwheel Pendant Instructions