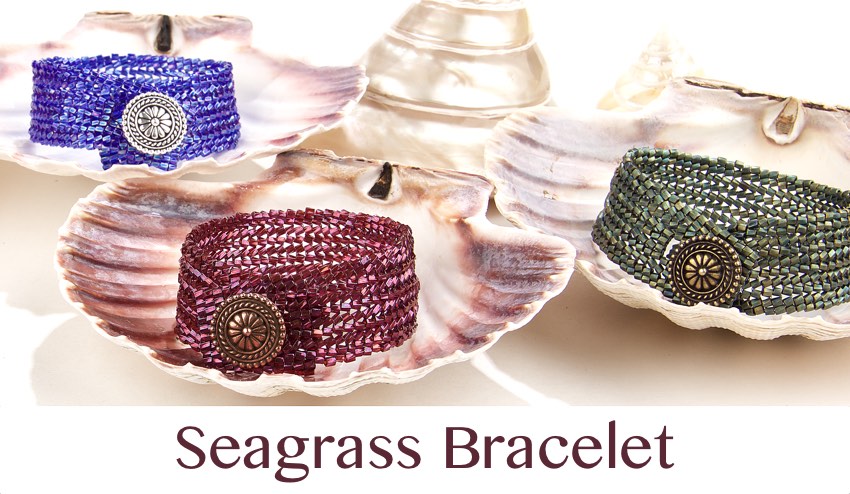
Materials:
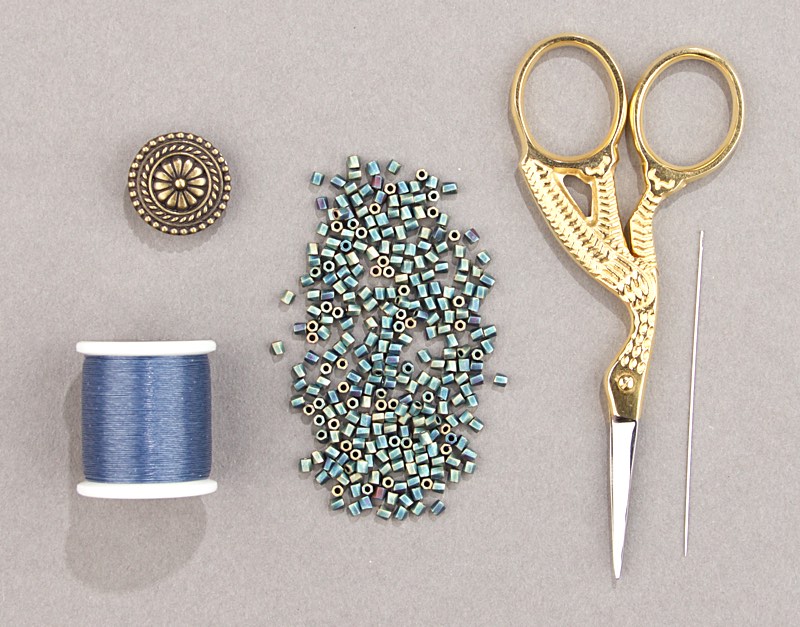
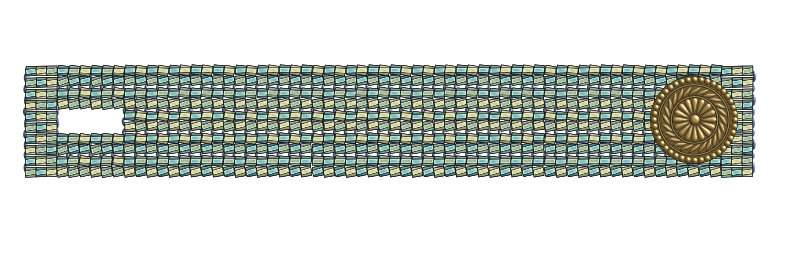
10C-TW-1256: Miyuki 10/0 Twisted Hex Cut Matte Met Patina Iris - 2 tubes
194-010-AB: Antique Brass 18mm Large Bali Button - 1 piece
MNT-17: Miyuki Dk Blue Nylon Beading Thread - 1 spool
193-103: Japanese Beading Needles
505-016: Gold Embroidery Scissors
 Download a pdf of this project to read on your computer or tablet
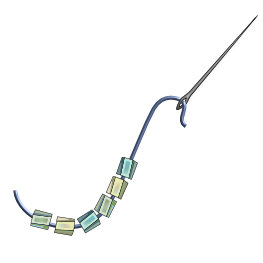
1. Cut a length of thread approximately 5' long. String on six 10/0 twisted hex cut beads (10C-TW) and bring them to the end of the thread, leaving an 8" tail.
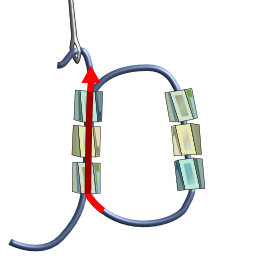
2. Pass the needle up through the first three beads to begin a ladder stitch.
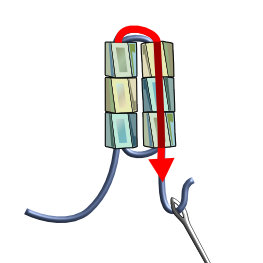
3. Pass the needle down through the three beads to the right. The 10C-TW beads will line up in columns of three side by side.
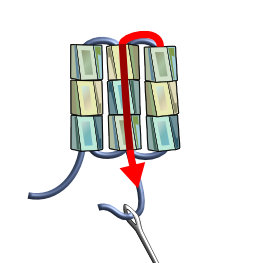
4. Continue ladder stitch by adding three 10C-TW beads and pass the needle back through column 2.
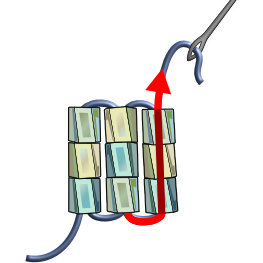
5. Pass the needle back up through column 3.
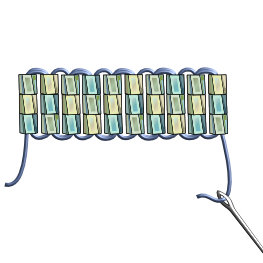
6. Continue in this way, ladder stitching 10C-TW beads in groups of three until there are ten columns.
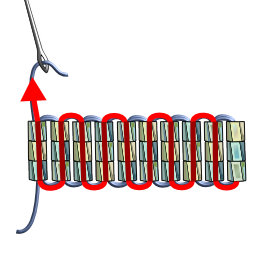
7. Work thread back to column 1 to reinforce the ladder stitch. The thread will now be positioned to begin the next section.
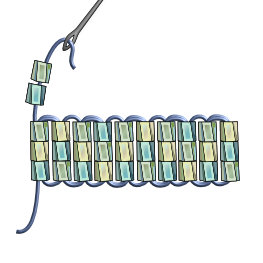
8. To begin Herringbone stitch, add two 10C-TW beads.
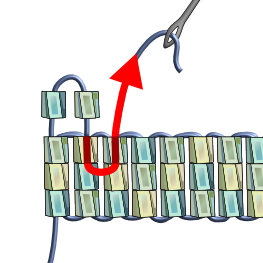
9. Moving right, stitch down through the 10C-TW bead in column 2. Go up into the next 10C-TW bead in column 3.
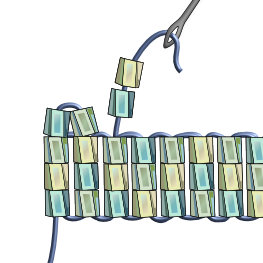
10. Add two 10C-TW beads.
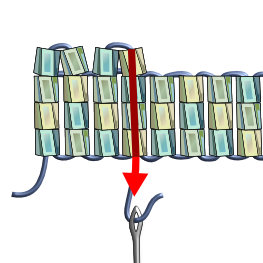
11. Stitch down through column 4.
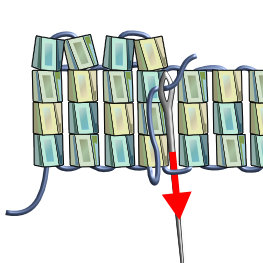
12. Pass the needle under the thread bridge connecting columns 4 and 5.
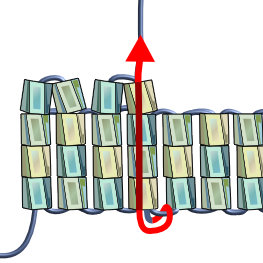
13. Stitch back up through column 4.
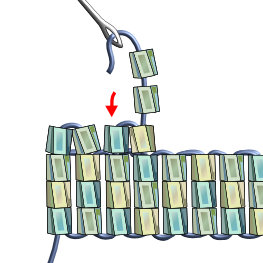
14. Add two 10C-TW beads.
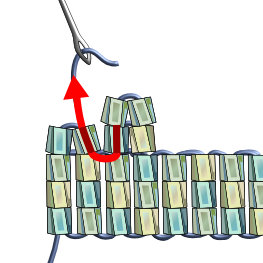
15. Moving left, stitch down through the 10C-TW in column 3, then up through the 10C-TW in column 2.
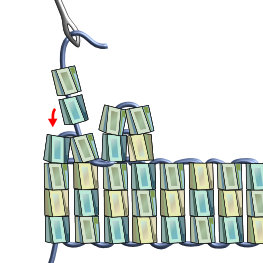
16. Add two 10C-TW beads.
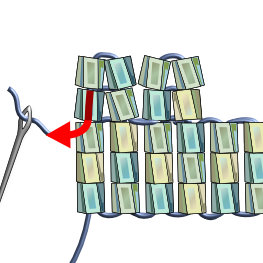
17. Stitch down through the 10C-TW bead in column 1.
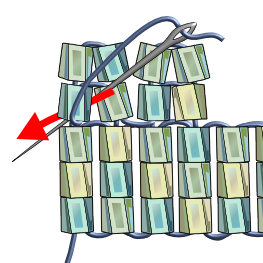
18. In the second row from the top, bring the needle between the two 10C-TW beads in column 1 and 2, so that the working thread catches the existing thread.
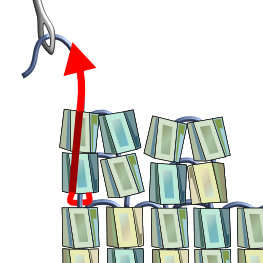
19. Pass the needle back up through the top two beads in column 1. This not only anchors the previous row into place but steps up to begin the next row.
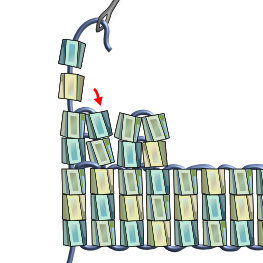
20. Add two 10C-TW beads.
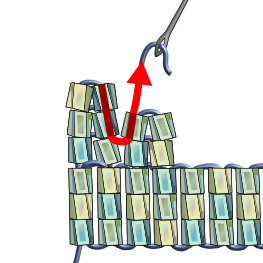
21. Moving right, stitch down through the 10C-TW bead in column 2. Go up into the next 10C-TW bead in column 3.
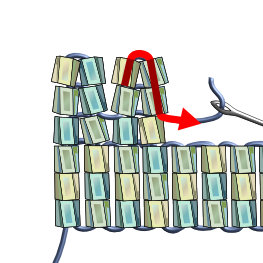
22. Add two 10C-TW beads and stitch down through the next 10C-TW to the right.
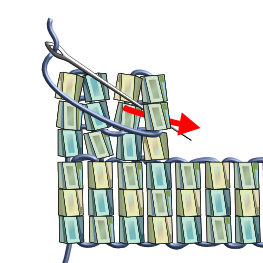
23. Working in the second row from the top, bring the needle between the two 10C-TW beads in column 3 and 4.
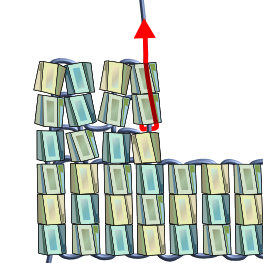
24. Pass the needle up through the top two beads in column 4.
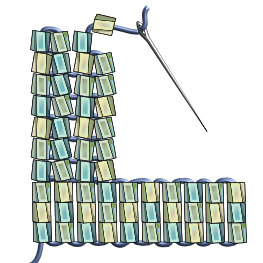
25. Continue herringbone stitch in this way, until you have seven rows in columns 1 - 4.
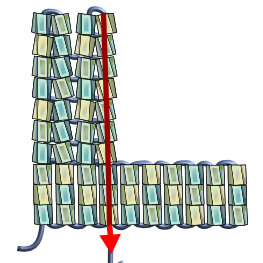
26. Pass the needle down through all of the beads in column 4.
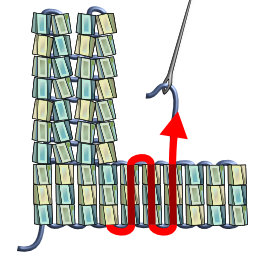
27. Work the thread across the ladder stitched section until it is coming up through column 7.
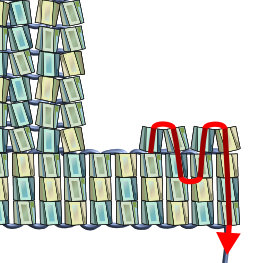
28. Going right, work in herringbone stitch across the remaining columns, exiting at the bottom of column 10.
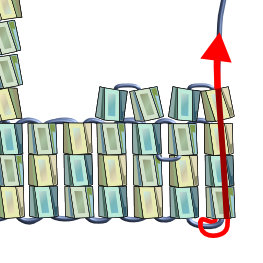
29. Pass the needle under the thread bridge connecting columns 9 and 10. Bring the needle up through all of the beads in column ten.
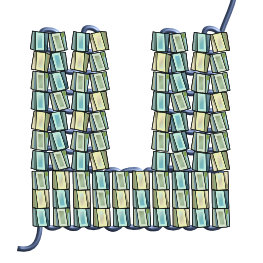
30. Continue herringbone stitch until you have seven rows in columns 7 - 10.
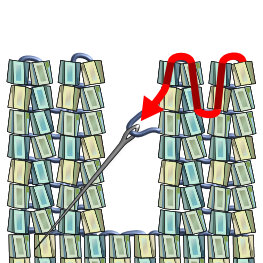
31. Moving from right to left, bring the needle and thread from column 10 to 7, following the diagrammed thread path. Exit through the bottom of the 10C-TW at the top of column 7.
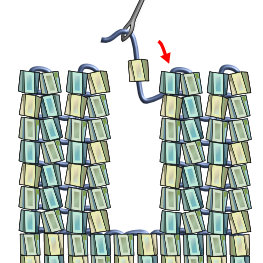
32. Add one 10C-TW and stitch back through the bead to the right.
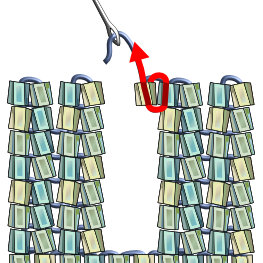
33. Complete a single ladder stitch by passing the needle back up through the newly added bead.
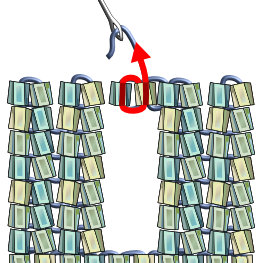
34. Ladder stitch a second bead onto the first. These two beads will bridge the gap over columns 5 and 6.
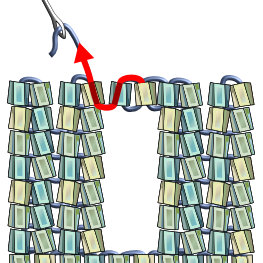
35. Attach the ladder stitched section by going up into the 10C-TW at the top of column 4.
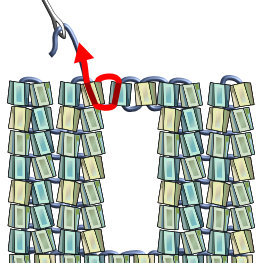
36. Secure the row by looping back through the 10C-TW beads in column 5 and 4.
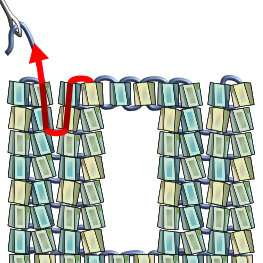
37. Continue to work across the row following the diagrammed thread path.
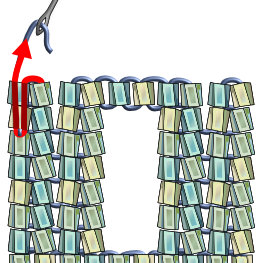
38. In the second row from the top, bring the needle between the two 10C-TW beads in column 1 and 2. Pass the needle back up through the top two beads in column 1, to anchor and step up to the next row.
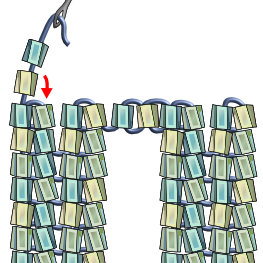
39. Add two 10C-TW beads.
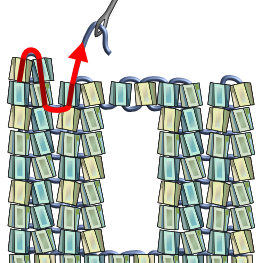
40. Moving right, stitch down through the 10C-TW bead in column 2. Go up into the next 10C-TW bead in column 3.
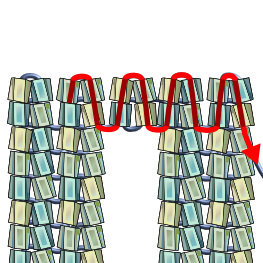
41. Continue in Herringbone stitch across the width of the bracelet.
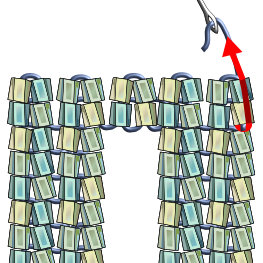
42. Repeat step 38 in columns 9 and 10 to anchor and step up to the next row.
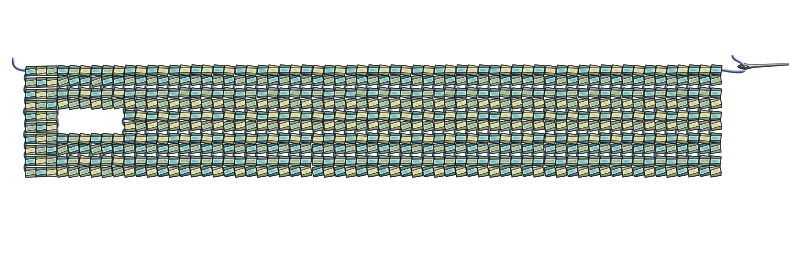
43. Continue working in flat herringbone until you have reached the desired length. Keep in mind the the bracelet should overlap about 3/4 of an inch to accommodate the button closure.
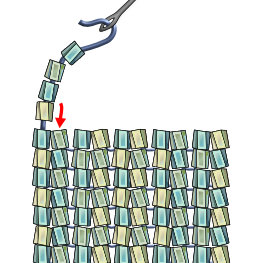
44. Add four 10C-TW beads to begin ladder stitch.
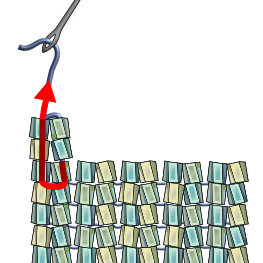
45. Stitch down into the 10C-TW at the top of column 2. Turn and go up through the three 10C-TW in column 1. The last row of herringbone will be incorporated into the ladder stitched section.
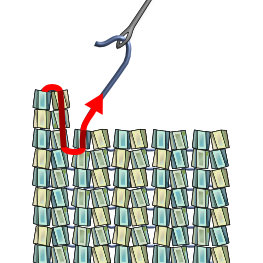
46. Moving right, stitch down through three 10C-TW beads in column 2. Go up into the next 10C-TW bead in column 3.
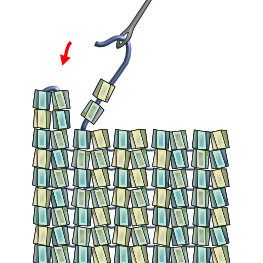
47. Add two 10C-TW beads.
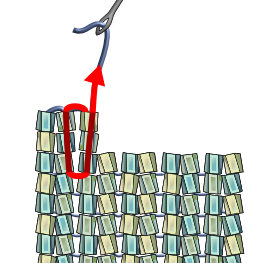
48. Ladder stitch the 10C-TW beads onto the top three beads in column 2.
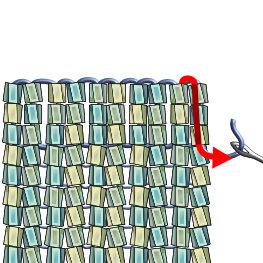
49. Continue in ladder stitch across the width of the bracelet. At the end of the row pass the needle down through the top three beads in column 10.
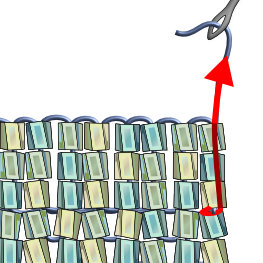
50. In the third row from the top anchor and step up to the bracelets top edge.
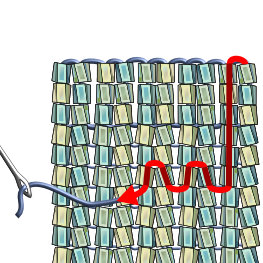
51. Work the needle and thread through the beads, following the diagrammed thread path. The thread will be exiting the sixth bead down in column 5.
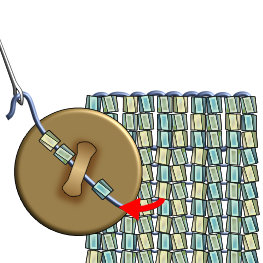
52. Add three 10C-TW beads and stitch through the shank of the button.
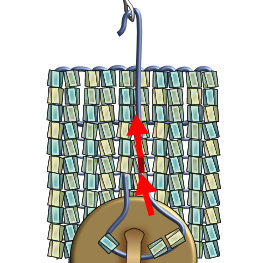
53. Stitch up through the sixth bead down in column 6.
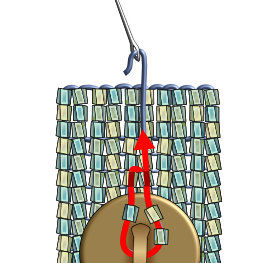
54. Reinforce this loop (steps 55 and 56) several times.
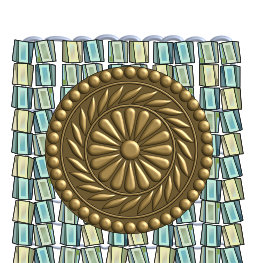
55. The button will flip onto the top of the bracelet and should be securely attached by the loop of beads.
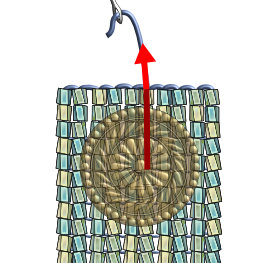
56. Pass the needle up through the remaining beads in column 6.
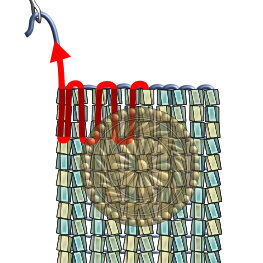
57. Weave the thread back into the bead work.
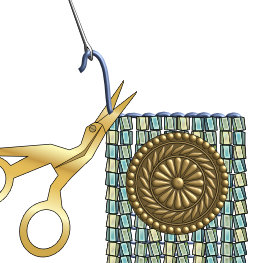
58. Trim threads and enjoy!
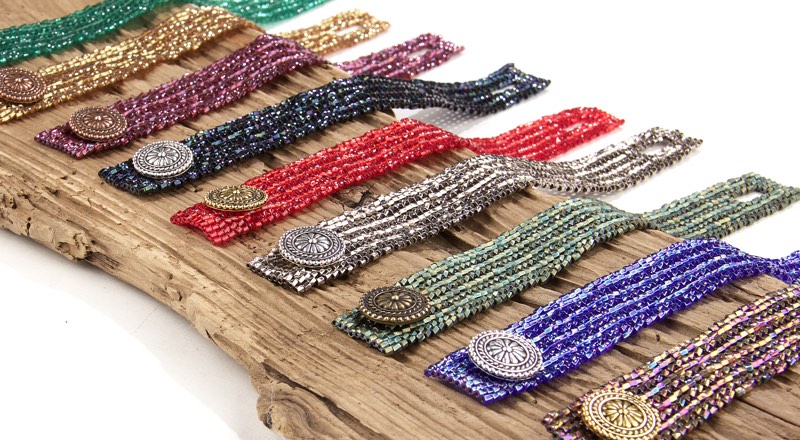
Amber
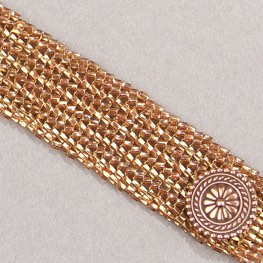
Materials:
10C-TW-311: Miyuki 10/0 Twisted Hex Cut Topaz Gold Luster - 2 tubes
194-010-C: Copper 18mm Large Bali Button - 1 piece
MNT-05: Miyuki Gold Nylon Beading Thread - 1 spool
193-103: Japanese Beading Needles
Emerald
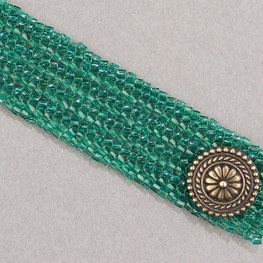
Materials:
10C-TW-147: Miyuki 10/0 Twisted Hex Cut Tr Emerald - 2 tubes
194-010-AB: Antique Brass 18mm Large Bali Button - 1 piece
MNT-11: Miyuki Green Nylon Beading Thread - 1 spool
193-103: Japanese Beading Needles
Garnet
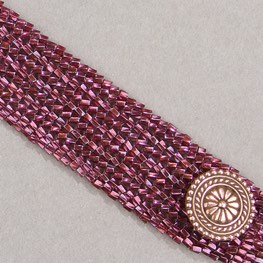
Materials:
10C-TW-313: Miyuki 10/0 Twisted Hex Cut Cranberry Gold Luster - 2 tubes
194-010-C: Copper 18mm Large Bali Button - 1 piece
MNT-09: Miyuki Purple Nylon Beading Thread - 1 spool
193-103: Japanese Beading Needles
Mystic Topaz
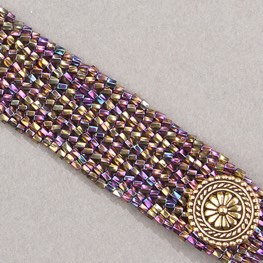
Materials:
10C-TW-188: Miyuki 10/0 Twisted Hex Cut Met Purple Gold Iris - 2 tubes
194-010-G: Gold 18mm Large Bali Button - 1 piece
MNT-09: Miyuki Purple Nylon Beading Thread - 1 spool
193-103: Japanese Beading Needles
Pearl
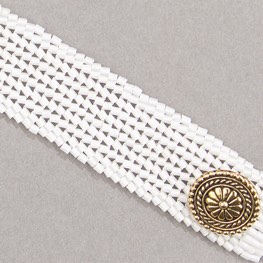
Materials:
10C-TW-551: Miyuki 10/0 Twisted Hex Cut Gilt Lined Opal - 2 tubes
194-010-G: Gold 18mm Large Bali Button - 1 piece
MNT-02: Miyuki Eggshell Nylon Beading Thread - 1 spool
193-103: Japanese Beading Needles
Platinum
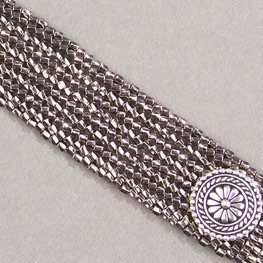
Materials:
10C-TW-190: Miyuki 10/0 Twisted Hex Cut Nickel Plated - 2 tubes
194-010-S: Silver 18mm Large Bali Button - 1 piece
MNT-12: Miyuki Black Nylon Beading Thread - 1 spool
193-103: Japanese Beading Needles
Ruby
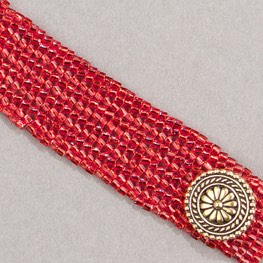
Materials:
10C-TW-11: Miyuki 10/0 Twisted Hex Cut S/L Ruby - 2 tubes
194-010-G: Gold 18mm Large Bali Button - 1 piece
MNT-08: Miyuki Red Nylon Beading Thread - 1 spool
193-103: Japanese Beading Needles
Sapphire
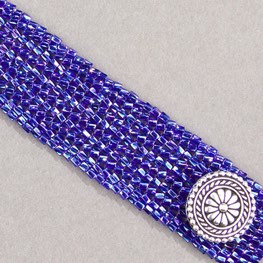
Materials:
10C-TW-177: Miyuki 10/0 Twisted Hex Cut Tr Cobalt AB - 2 tubes
194-010-S: Silver 18mm Large Bali Button - 1 piece
MNT-09: Miyuki Purple Nylon Beading Thread - 1 spool
193-103: Japanese Beading Needles
Spinel
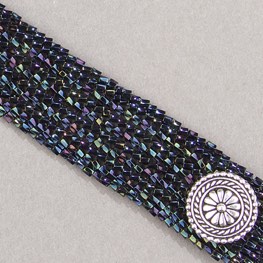
Materials:
10C-TW-452: Miyuki 10/0 Twisted Hex Cut Met Dk Blue Iris - 2 tubes
194-010-S: Silver 18mm Large Bali Button - 1 piece
MNT-12: Miyuki Black Nylon Beading Thread - 1 spool
193-103: Japanese Beading Needles
Turquoise
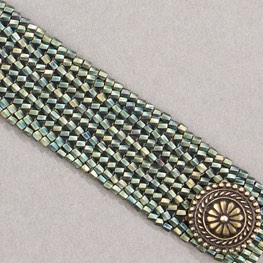
Materials:
10C-TW-1256: Miyuki 10/0 Twisted Hex Cut Matte Met Patina Iris - 2 tubes
194-010-AB: Antique Brass 18mm Large Bali Button - 1 piece
MNT-17: Miyuki Dk Blue Nylon Beading Thread - 1 spool
193-103: Japanese Beading Needles